Showing posts with label Artbooking. Show all posts

Tuesday, April 29, 2014

Who wants a FREE Close To My Heart Cricut Cartridge?

There are 3 to choose from,

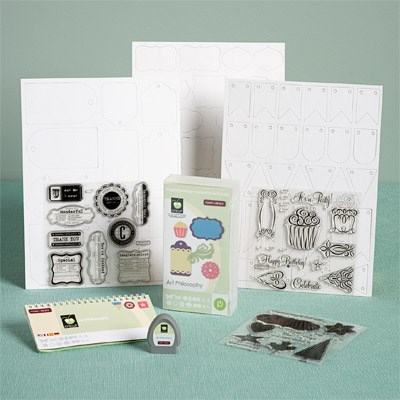
Art Philosophy
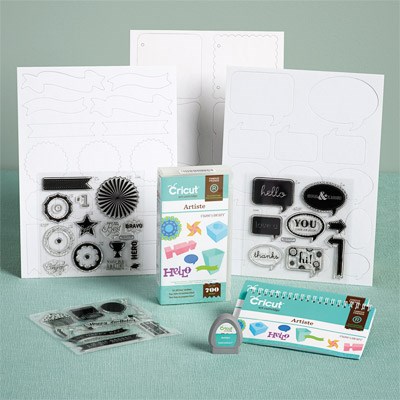
Artiste
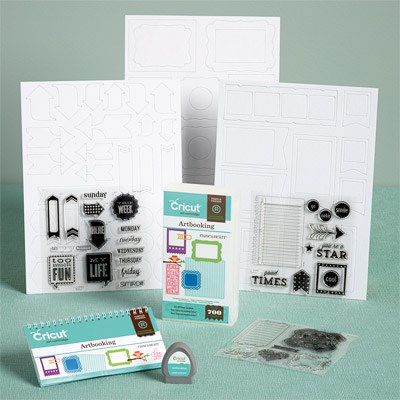
Artbooking

 If you sign up as a consultant with Close To My Heart in April, you will get all of this and a FREE Cricut Cartridge.  Hurry you only have 2 more days.  Offer ends April 30, 2014.  Here's the link to get started. https://orders.closetomyheart.com/enrollment/default.aspx?sponsorid=guP6l2KwYLm0tz72hcvN7JF5iFDo4R1hCoKnw5j5cdo%3d&c=1

 Sign up and I will make sure you get the Stamp Of The Month FREE also.  Balloon Talk # S1404

Hurry before it's too late.

Happy Scrappin',

Janice

Thursday, April 24, 2014

Receive over $400 worth of product* for only $99!

Join Close To My Heart as an Independent Consultant April 1–30, 2014, and receive your favorite “art-full” Close To My Heart Cricut® collection FREE! 

Our New Consultant Kit is just $99 and comes packed with nearly triple the retail value in products and supplies to help you succeed. Plus, when you qualify for the Straight To The Top program, you will be refunded the price of your New Consultant Kit. Select your FREE Cricut® collection—retail priced at $99—when you order your New Consultant Kit and watch your new business soar!
Contact me for more details.
*Offer valid April 1–30, 2014. No tax or shipping will be charged on the free item(s). 

Do you crave creativity, relish warm relationships, or savor industry? We embrace all types, whether you’re creative-, community-, or business-minded. By becoming a Close To My Heart Consultant, you join an elite team that supports and honors what makes you exceptional.
It’s easy to join. Start by clicking on the “Let’s Get Started” link at the bottom of this page and completing the form. As part of your enrollment you will purchase the New Consultant Kit for only $99. The kit includes the basic business and creative supplies you need to start your journey off right, and the retail value of the supplies in the kit is approximately $309—a fantastic deal!


CONTENTS OF THE NEW CONSULTANT KIT INCLUDE:

  • Read Me First Letter
  • Spring/Summer 2014 Idea Books (qty. 10)
  • Hostess Order Forms (qty. 25)
  • Customer Order Forms (qty. 25)
  • Close To My Heart Color Swatches (W471)
  • Spring/Summer 2014 B&T Duos™ Sampler (W1127)
  • Petite Perks™ Delicate Wings Incentive Stamp Set (qty. 5) (W2028)
  • Reflections™ Scrapbook Program (9037)
  • Originals Card Confidence Program™ (9036)
  • Workshops on the Go™ Skylark Scrapbooking Kit (G1072)
  • Skylark Complements Dimensional Elements (X7177C)
  • Skylark B&T Duos™ Bulk Paper (BULK322)
  • Skylark Bulk Resin Flowers (BULK340)
  • Durables Triangle Studs (Z1928)
  • Teal Shimmer Trim (Z1918)
  • Lagoon Exclusive Inks™ Pad (Z2195)
  • Desert Sand Exclusive Inks™ Pad (Z2118)
  • Slate Exclusive Inks™ Pad (Z2173)
  • My Acrylix™ Hopscotch Alphabet Stamp Set (E1028)
  • My Acrylix™ True to Life Stamp Set (C1575)
  • My Acrylix™ Believe in Yourself Stamp Set (C1574)
  • 3" × 3" My Acrylix™ Block (Y1006)
  • 4" × 5" My Acrylix™ Block (Y1012)
  • 2" × 6½" My Acrylix™ Block (Y1010)
  • Non-Stick Micro-Tip Scissors (Z1836)
  • My Acrylix™ Stamp Scrubber (Z1782)
  • My Acrylix™ Spritz Cleaner (1778)
  • Bonding Memories™ Glue (1512)
  • Sponge (Z697)
  • Liquid Glass (Z679)
  • and Cello Bags (qty. 25) (W1152)
(Some items may not be shown. Contents are subject to change without notice.)

In addition to the kit you get to choose one of the following Cricut Collections too.

1. Cricut® Art Philosophy Collection

Item Number: Z1686  Retail Value $99.00

PRODUCT DESCRIPTION

Featuring hundreds of basic, versatile shapes and fonts you'll use every day, many of which coordinate with dozens of our My Acrylix® stamps, this collection is a must-have for every crafter!
Cricut® Art Philosophy Collection includes:
1 – Cartridge (700 images: font, shapes, and 3-D items)
3 – My Acrylix™ D-size stamp sets
3 – 9" × 12" Dimensional Elements (3 sheets of different shapes)

Creative Feature Keys: Layer, Decorative Layer, Tag, Card, Font, Font Layer.
Recommended blocks for included stamp sets: 1" × 1" (Y1000), 2" × 2" (Y1003), 2" × 3½" (Y1009), 3" × 3" (Y1006).
Cricut® is a registered trademark of Provo Craft & Novelty, Inc. All rights reserved.


2. Cricut® Artiste Collection

Item Number: Z1790 Retail Value $99.00

PRODUCT DESCRIPTION

With just the touch of one Cricut® Artiste key you can take your creativity over the top with wonderful 3-D projects, party favors, interactive cards, awards, and more! From robots and spooks to weddings and Valentines, your cupcake wrappers, invitations, and party essentials will coordinate and come together for any celebration! Includes a step-by-step assembly booklet for the 3-D projects.
Collection includes:
  • 1 – Cartridge (700 images: themed projects, cards, fonts, shapes, and 3-D items)
  • 3 – My Acrylix™ D-size stamp sets
  • 3 – 12" × 9" Dimensional Elements (3 sheets of different shapes)
Creative Feature Keys: Accent 1, Accent 2, Accent 3, Accent 4, Card, 3D Object.
Recommended blocks for included stamp sets: 3" × 3" (Y1006), 2" × 3½" (Y1009), 2" x 6½" (Y1010).
Cricut® is a registered trademark of Provo Craft & Novelty, Inc. All rights reserved.


3. Cricut® Artbooking Collection

Item Number: Z1906 Retail Value $99.00


PRODUCT DESCRIPTION

Take your scrapbooking to never-before-seen levels with the new Cricut® Artbooking collection! With oodles of images in each of 15 layout themes, you can create several coordinating pages for each theme using just two keys and one dial size. Images include accents, borders, titles, overlays, photo mats—in standard photo sizes!—and more. The Cricut® keys are optimized for creating 12" × 12" pages in a jiffy. You'll also love creating 10 themed mini books, also optimized for several different sizes using just two keys and one dial size. When you're finished cutting, use the coordinating stamp sets and Dimensional Elements shapes to add even more pizzazz!
Collection includes:
1 – Cartridge (700 images: Font, Mini Books, Layouts)
3 – My Acrylix™ D-size stamp sets
3 – 12" × 9" Dimensional Elements (3 sheets of different shapes)

Creative Feature Keys: Title, Photo Mat 1, Photo Mat 2, Icon, Border, Overlay.
Recommended blocks for included stamp sets: 1" × 1" (Y1000), 1" × 3½" (Y1002), 2" × 2" (Y1003), 3" × 3" (Y1006), 2" x 3½" (Y1009), 4" × 5" (Y1012).
Cricut® is a registered trademark of Provo Craft & Novelty, Inc. All rights reserved.

You also get the Stamp Of the Month for just $5.00


This is such a great offer, I know you will love everything you get.  
If you still have questions please call me and I will arrange a time to sit and discuss everything with you.  

Happy Scrappin',

Janice

Monday, February 24, 2014

Cross-Cartridge Collaboration


While each Cricut® collection from Close To My Heart is a treasure trove all its own, together they offer an unmatchable selection of borders, overlays, photo mats, and much, much more! The thousands of both classic and trendy die-cuts found within this terrific trio will ensure that the projects you make are always uniquely your own. Mix 'em, match 'em, and love 'em!

If you have any questions please call me 503-708-6889.

Happy Scrappin',

Janice

Sunday, December 15, 2013

Clearly The Best: Swirlin' Shapes


Close To My Heart shows you how to make a photo focal point on your layouts by swirling shapes made with our Cricut® cartridges.

These ladies are so talented and I love watching them show us how to do what they do,  

The Close To My Heart Cricut cartridges come in a bundle and have 3 stamp sets and 3 packs of chipboard that all match the shapes on the cartridge,  

Art Philosophy bundle $99.00
 Artiste Bundle $99.00
Artbooking Bundle$99.00

If you are interested in any of the Close To My Heart Cricut Cartridges call me 503-708-6889 or send me an email to jwilson@bctonline.com.  You can also go to my website and order them online.

Happy Scrappin',

Janice


Saturday, November 23, 2013

Artbooking Made Easy: Christmas Layouts


Try out Close To My Heart's Cricut® Artbooking cartridge for some holiday hullabaloo on your Christmas layouts! Its themed borders, overlays, photo mats, and more hold plenty of cheery possibilities to brighten your albums. Trim your trims, ornament your ornaments, and have a holly jolly time making Christmas layouts that last—all with just two keys!

If you would like to make this, you can order all the supplies Here!

Super cute Layouts for Christmas.

Happy Scrappin',

Janice

Wednesday, November 13, 2013

Artbooking Made Easy: Cross-Cartridge Collaboration


While each Cricut® collection from Close To My Heart is a treasure trove all its own, together they offer an unmatchable selection of borders, overlays, photo mats, and much, much more! The thousands of both classic and trendy die-cuts found within this terrific trio will ensure that the projects you make are always uniquely your own. Mix 'em, match 'em, and love 'em!

Monday, November 11, 2013

Artbooking Made Easy: Fall into Artbooking


Fall for the autumn-themed projects you see in this video, all made with the Cricut® Artbooking cartridge from Close To My Heart!

If you wish to purchase the Artbooking Cricut Cartridge click here

Tuesday, November 5, 2013

Artbooking Made Easy: Everyday Layouts


Combine cuts from a variety of themes from Close To My Heart's Cricut® Artbooking cartridge to make original papercrafted masterpieces. Watch the video to kick-start your ideas!

If you would like to purchase the Artbooking Cricut Cartridge click here.

If you have questions please call me 503-708-6889.

Happy Scrappin',

Janice

Monday, November 4, 2013

Artbooking Made Easy: Festive Mini Albums


With the Cricut® Artbooking cartridge from Close To My Heart, your photos will find a cozy home on the pages of a dazzling holiday mini album. Watch the video to gather your own ideas on how to use its themed keys to create merry and bright holiday projects that last.

You can purchase the Artbooking Cricut Cartridge here 

If you have any questions please Call or Text me at 503-708-6889 or Email me at jwilson@bctonline.com

I also teach classes using the cartridges if you are interested contact me.

I hope  this helps you understand and better use the Artbooking Cartridge.

Happy Sceappin',

Janice

Saturday, September 21, 2013

Artbooking Made Easy (S01E03): Summer Mini-Albums


From grilling to swimming, camping, and road-tripping, Close To My Heart makes it easy for you to capture your summer memories in fun, unique mini-albums. See how they're made with the new Cricut® Artbooking collection  I just love making these adorable little Mini Albums.  I you want to order the necessary items to make these mini albums you can click here or Call me 503-708-6889.  

Happy Scrappin',

Janice

Thursday, September 19, 2013

Artboooking Made Easy (S01E02): A+ School Layouts


Close To My Heart's new Cricut® Artbooking collection will give you what you need to score an A+ on back-to-school projects! See how to make your own in this video.

Wednesday, September 11, 2013

Create with Cricut® Collections


Enhance the artist within you by cutting and assembling foundational shapes, 3-D items, and themed mini books with Close To My Heart's stunning Cricut® Collections! With limitless options for shapes, themes, and sizes, our Cricut® Collections will bring you hours of exciting creative sessions.

Thursday, August 29, 2013

And yet another project!

I am so excited!!!  This one, I think I will get a lot of use out of.  It was pretty easy once I figured out what I wanted to do.  I was on Facebook one evening and another consultant had posted one that she had made for Convention.( I will share the link and credits at the end of this post.)
  Mine is a little different as I am not using a Cast Iron Cookbook Stand to hold mine upright. 

I can tell you that I started with a white 22" round pressboard cake board and an 11" tan plastic Rubbermaid Lazy Susan, some Black acrylic paint and some unsanded grout.  


Do you have any idea what this is?


 I made my own chalkboard paint using 1 - 2 oz bottle of Black acrylic paint and about 1/4 cup unsanded grout  Mixed it well and painted both the cake board and lazy susan. (3 Coats each)  Once the paint was dry I took a piece of chalk and conditioned the boards, by rubbing the chalk all over them and then wiping off the dust.  

Now do you have an idea what it might be?


Ok, here is another hint.

I then took CTMH's silver glitter tape and put 4 strips across it in different directions making the pattern on it.  I used E6000 glue to adhere the lazy susan to the cake board, making sure to center it.  The glitter tape divides the chalkboard into sections for me to write different things in for different events.


Ok, it is starting to remind you of anything yet?


Here is what I did to finish off the project.
I took CTMH's silver glitter paper and cut a large arrow


from the Artiste Cricut cartridge on the Cricut.  And placed it in the center of the lazy susan.  I also cut out some letters. T, S, W, I, I, i, i, n, n, p, t, t and o.  I decided I wanted them to stay put, so I ran them through the Xyron 150 sticker maker with permanent adhesive in it.  I then lined them up on the lazy susan part of the board to Spell out the name of our very own,


Wait for it!  


Wait for it!


"Spin It To Win It" Game board.


Ta da!


I'm always trying to come up with ways to entertain our guests at our Idea Book Kick-off parties and I think we can use this one at the Clark County Women's Expo in September too.  

You should stop by and see what we put on the board for you to win.  

Clark County Women's Expo September 14th and 15th. 
Clark County Event Center
17402 NE Delfel Rd Ridgefield, WA 98642
(360) 397-6180
Here is a link to get there.
Please mark you calendars and come see us.


Here is the link to Wendy's Spin It to Win It Board http://www.stampingrules.com/2013/08/friday-favorite-things.html

Sunday, August 18, 2013

Clark County Women's Expo. September 14th & 15th 2013.

I am so excited!!!  
Shannon Buck and I are going to have a Close To My Heart booth at the Clark County Women's Expo. in Ridgefield, Washington at 
The Clark County Event Center Exhibit Hall "A"
September 14th 10:00 am to 7:00 pm and September 15th from 10:00 am to 4:00 pm.
 topCOMP3

We have lots of plans for the event. So stay tuned for more info. coming soon.

We will be promoting our upcoming classes and workshops. 

Come visit us and be the first to sign up.  

You might even win a prize.

Want to win a $500 shopping spree? Mark your calendar for the Clark County Women's Expo - September 14th and 15th.  Each visitor will be entered to win! www.ccwomens-expo.com

Monday, August 12, 2013

Mixed Media Art Canvas for last Saturday's Class.

Here are the samples that I created for the Mixed Media canvas class I taught on Saturday.

When I created this one I knew I wanted to use the Gears from the Artiste Cricut Cartridge and I knew I wanted them to look old and rusty.  I found a Gear stencil on Amazon.com and purchased it for this project.  I first started by printing the picture out on printer paper.  I then used Mod Podge to glue the picture face down to the canvas.  If you choose to follow my directions DO NOT add Mod Podge to the top of the picture. I wiped the excess Mod Podge off the canvas with a damp cloth.  I used a heat gun too dry the Mod Podge.  Once the canvas was dry I spritzed it with water and gently rubbed the paper off leaving the picture.  The image that it leaves is grainy because it is on the canvas.  I liked the results, but then I spritzed Slate Gray ink over Jordan's face, that is why I covered it with an actual picture.  If you like the look of a clear picture, this technique probably is not the look you will like.

I used CTMH's inks and Acrylic paint to sponge different colors on top of each other. It became really dark so I used some Gesso to cover and lighten it up, then I added color back into the area I thought was too light.  I cut the gears on the Cricut from the Artiste Cricut Cartridge I cut some from Chipboard and some I welded in the Cricut Design Studio and cut out of paper.  I sponged paint and ink to the gears and I also covered 2 of the gears in Liquid Glass and let them dry. Then I added the chipboard gears and the paper gears to the canvas.  I then layered the picture onto the Whisper cardstock and adhered it to the canvas.  I love how this turned out.

With the second one, I used Texture paste and stencils, ink and acrylic paint.  The peacock feathers are first done in texture paste then I sponged green paint over them and then I decided to add the brown with a marker to highlight the feathers.   You can't see all the texture on the canvas but there are layers upon layers of sponging and texture.  I punched out butterflies and stamped a close pattern on them.  I cut the roses from the Artbooking Cricut cartridge and curled them with CTMH's Quilling tool and glued them in place.  I cut 2 sizes of the other flowers and layered them after I used the Sizzix Susan's Garden Tool Kit for sculpting the flowers.
I added the yellow stars to the centers to finish them off.  I cut 2 intricate swirly designs from the Artbooking cricut cartridge, one in Lagoon and one in Gypsy and placed them on the canvas.  I backed the pictures of Hailey giving me a pedicure in Black and then in Gypsy and used 2 layers of foam tape to pop them up off the canvas.  In the lower right corner I added some black tulle, a Olive swirl and some bling.  I added 3mm flat back pearls to the scallop edge of the picture and on the butterflies.

I had 4 ladies take the class on Saturday and here are their canvases.  I love how each one is different and very creative.  I had the ladies practice with the paint and texture paste on scrap paper before they started on their canvases.  Liz even used paint with a stamp and stamped the swirls on the left side of the picture.  She added texture paste over the teal paint.   
 Karen brought her own stencils and used them.  She decided she wanted to experience the whole technique so she actually glued the picture to the canvas and after adding the texture paste she decided she wanted to add an actual picture where she used Gesso to cover the image.  I cut some gears out for her to use on the canvas also.  You will be seeing more of Karen's artwork as she joined my CTMH Scraptastic Treasures' Team.  Welcome to the team Karen.
 Heather used Red and Blue paint and sponged it on the canvas, then added texture paste to the center of the canvas and then painted it Yellow.  She Sponged red paint over the gears stencil and I cut out gears from the Artiste cricut cartridge.  She added green brads to the gears and popped them up on foam tape.  She backed the picture and placed it on the yellow texture.
Stacy added texture paste with a leaf stencil to the corners of her canvas and painted then added color on top of the leaves to bring all the colors together.  I cut Dragonflies from the Art Philosophy Cricut cartridge.  Stacy stamped an image in Chocolate ink on Daisy White cardstock and I cut the
overlay dragonfly image and then cut the main dragonfly base from Creme Brulee cardstock Stacy glued them together with liquid glass and adhered them to the canvas. We cut the word Live out in two sizes from the Artiste Cricut Cartridge and she used the larger L and the smaller "ive" then added a small heart, that we also cut from the Artiste cartridge, over the i to make it L♥ve.  Stacy then added Liquid Glass to the heart to make it shine.  We cut 3 rolled roses from the White cardstock that she had stamp in chocolate and she placed them on the canvas.  She forgot to bring her picture but knows where she wanted to place it when she returned home.
 They all turned out so cool.  Now I have lots of ideas to use on the other 2 canvases I plan on creating watch for those in the coming weeks.

I enjoyed teaching the class on Saturday, meeting new people and sharing ideas.

On Sunday, I was just getting ready to unload the van from the night before and the house phone rang.  It was my friend Jeannie.  I haven't heard from her in months and was so excited.  She asked what I had been up to and so I told her about my canvas class and she wanted to take the next one.  She asked if we could do the class at my home.  Of course I said yes!  
The canvas below is the one my friend Jeanie created at my house on Sunday.  She used a page from a magazine and a picture.  She glued the picture to the canvas and rubbed off the paper.  then painted around it.  Jeanie added texture and sponged over stencils, she also spritzed ink onto the canvas over the gears.  Jeanie stamped the swirls onto the magazine page and glued them to the canvas with Mod Podge.  This is kind of dark but we both liked it when she was finished.
.
It was so good to see her again.  I had such a great weekend.  

Watch for more artwork coming soon, as I am working on projects for the Clark County Women's Expo. in Ridgefield WA.  September 14th & 15th.  

Happy Scrappin',

Janice


Tuesday, August 6, 2013

IdeaBook Kick-off Party favors and Make-Take

I almost forgot, Dawn made these cute little bags for our guests that came to the Ideabook Kick-off party.

This bag was cut from the Art Philosophy Cricut Cartridge and decorated with the new Frosted paper pack.  The Snowflakes are from Art Philosophy and Artiste cartridges and she added sparkles and Rhinestones to the centers.  I filled them with chocolate.
 This one was decorated with the Pro Player paper pack and the Gears are from the Artiste cartridge.  Dawn added Black brads to the gears.
 This one is decorated with the new Huntington paper pack and an old frame.  The Fleur Di Lis is cut from the Artiste cartridge also.
  This on is one of my favorites.  It was decorated using Laughing Lola papers and embellished with Black Tulle and a Buttercup medallion cut from the Artiste Cartridge.

I just love these little bags. you can do so many things with them.

Here is the Make-N-Take that I created.  
I used the Artbooking Cricut Cartridge and cut a tag from page 50 (Borders & Shift) using Colonial White cardstock and then cut another one out of the Sarita paper at 8".  I cut the Branch from page 84 and Owls from page 85.  I used Chocolate and Olive cardstock for the Branch and Leaves and Slate and Whisper cardstock for the Owl.

Hope this helps inspire someone.

Happy Scrappin',

Janice

Sunday, August 4, 2013

Artbooking 6 x 6 Mini album.

This is another mini album that Dawn created for me.  She asked me to help her add pictures and embellish it so that is all I did. I love how she out it together using the Sarita Papers.  I took these pictures late at night so they didn't turn out as good as I had hoped they would.  This little book looks way better in person. 

 Some of the flowers are our new Metal accents and some are rolled roses. I also added the clear accent flowers.
 These flowers are from the Art Philosophy Cartridge.

 The Butterfly is from the Love This Stamp set.


I now have mini album fever.

Happy Scrappin',

Janice

Saturday, August 3, 2013

Babycakes Mini Album

My Guest Designer Dawn created this adorable little mini album by cutting the coordinating images from the new Artbooking Cricut Cartridge from Close To My Heart.  Once you select which mini you want to make, the book tells you what size to cut them,  This one was cut at 8".  All of the pages and overlays including the animals are from 2 pages in the Artbooking handbook, p50 & p51.  Each piece that goes with the selected mini album automatically cuts the right size for the album.  No guessing or having to use the real dial size button and calculating the correct size.   Dawn used Chocolate, Sunset, Buttercup, Slate and Whisper cardstock to cut the main pieces of this album.  Then used the new Babycakes paper to decorate some of the pages and inside the envelopes.  She also used the Brown glitter paper along with Burlap ribbon and Bronze Glitz glue. 
How cute is this little Giraffe?
 Dawn asked my other Guest Designer Tarina to help decorate this little mini album.  They used some buttons with hemp, chocolate Grosgrain ribbon and washi tape to decorate the pages.
 Top one has the envelope open and the bottom pic has the envelope closed.
 They added pockets and tags with Organdy ribbon and words cut from the Cricut.
  
How cute is the adorable little lion cut from our Burlap Ribbon. This was an addition from Tarina and was perfect for the page.


  Tarina added a page scalloped oval for journaling. 
 The back page is an envelope and has a tag that is large enough to hold a 4 x 6 picture, on both sides and other memorabilia too.  


Isn't this just adorable?  I love this new cartridge.  Have I said that before? Well YES, I have.

Happy Scrappin',

Janice