Wednesday, February 27, 2013

Claire Scrapbook Layout for Girls

Dawn took the same pattern and papers as I used for the Boys Layout last week and turned it into a Girls page.  She added pearls where the black circles were and flipped the B&T paper over to show the floral side.

Here's the Boys page again.

Just wanted to share how you can use the same papers and layout and make it a boys or girls page depending on the B&T papers and embellishments used.

Happy Scrappin',

Janice

Tuesday, February 26, 2013

Baby Shower party favors and decorations

This has been really hard for me, because I couldn't post anything until the party, so I didn't ruin the surprise.  I have been busy making party favors and decorations for a lady who is in our Portland Friends Scrap Meetup Group.  She is due in April with her 2nd little Boy.  She and her family recently moved here from Colorado and they only know a few people, so I wanted to throw her a shower and let her know she has Family here too.

Her friend Jenna, told me that her colors were Chocolate brown, Blue and dark Maroon.  
Here is the banner that I made for the shower.  She said it was perfect and she loved it.  Yeah.  She said she was putting it in Alan's book.
 The little shirt on the left says If you (mustache) I am a Boob man.
and the one on the right says If you (mustache) I am a Momma's Boy.  I found a free cut file for the onesie on the internet and I can't remember where and I can't find it again to give credit, sorry. 

Here is the Sleeping Baby Diaper Cake. Tarina put it together for me.
I bought a complete outfit, sleeper, hat, bib and socks. I also purchased Clothe diapers, wash clothes, pacifiers and receiving blankets to use as fillers and to complete the diaper cake.  Everyone loved this adorable cake.  Thank you so much Tarina for saving me again. 

 Here are some of the treat boxes that I made using a cut file that I purchased from myscrapchick.com I made a cut file of my Sizzix die Paper doll boys hair and made it fit the baby cut file.  I also made a cut file that goes behind the head for the hair also.  I gave some babies mustaches and some are looking up so all you can see is a wide open mouth smile.  I think they turned out very cute.
 Here is a close up so you can see the details on the hands and feet.
 Shannon doesn't do boys so here is the one girl treat box that I made.  
I painted her finger and toe nails and added a "y" near the bottom middle of the box, for a but crack. I had so much fun playing with these.  I can see so many more things you can do for a little girls baby shower too.  

I made 26 of these little Baby treat boxes and filled them with candy. 
They are going to be part of the games.  
I gave small prizes for the people who chose Red headed babies and ones with Mustaches.
I always like to give a gift to the Big Brother so I decorated up a bag and put my gift in and there is plenty of room for others to add to it if the wish too.
I used the Latr Sk8r paper pack to decorate the bag. I also used the CTMH Artiste Cricut Cartridge to cut out the gears and borders along with the medallions and the tags.  
I used the In Gear stamp set to stamp on the tag.

I found lots of games to play, on the internet.  I decided we will play The Price is Right game. 
 I will have 6 items laying out on a table and 3 x 5 cards with the correct prices on them laying randomly in front of the items.  I have the 6 Baby items labeled A, B, C, D, E and F.  I will give all the guests a 3 x 5 card that has the Items listed next to their letter and a blank spot for them to write in the correct price.  The person who gets them all right or at least most of them right gets a prize and Stacy gets to take all 6 items home with her.  We had 4 winners and everyone was disappointed that I didn't bring my wheel in for them to spin.  


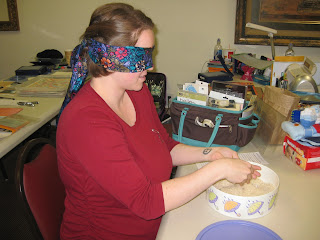
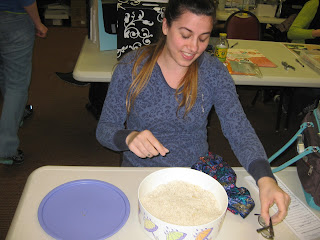
I have tiny safety pins that I put into a bowl of uncooked rice and they have to see how many pins they can pull out of the rice in 1 minute.  The one who pulls out the most pins will get a prize.


We will all be wearing safety pins on our lapels and if anyone is caught saying Baby then the person that caught them will get to take their pins and add them to theirs.  The person with the most pins at the end of the night will get a gift.

Ok, here is "Mom to Be" Stacy walking in early to her Surprise Baby Shower and doesn't have a clue what is going on yet.  Being Miss congeniality as usual.   
She was visiting with Dawn and I and turned to see 2 life like baby dolls laying on the table in front of Dawn and then took a quick look around the room to see all of the stuff we had set up.
I made 2 kinds of Garbage bread, the Chicken Broccoli one and a
Mediterranean one.  It is to the left on the top picture and on the right on the bottom pic.


 She then saw the sign and realized we had planned a surprise party for her.
 Here are her favorite Chocolate Chip Red Velvet Cupcakes with real Cream Cheese frosting.
Here Stacy is trying to find the tiny safety pins in the rice.
 Glenda trying to find them.

Kathleen trying.
 Jenna trying,
 Tina found 3.
 Abby found 2.
 Stacy getting ready to open her gifts.
 This was the cutest little Squash book, Jean Pilch made it using Cardboard, B&T paper and
The Wizard of Oz Stickers.


Here the squash book is open so you can see the 3 different papers.
Dawn and I had to leave early and Stacy insisted on helping us load up the car. These are the 2 life like baby dolls that were laying on the table, (Gabriel and Charlie) that we were going to dress them blindfolded but ran out of time to work it in.  Doesn't she look like a natural? 

We had so much fun playing all the games,  I hope they were able to get a lot of scrapping done after we left.

Happy Scrappin',

Janice

Saturday, February 23, 2013

Hubby's Valentine bouquet

This is the Candy bouquet that I made for my dear Hubby for Valentines Day.
I used the CTMH Artiste Cricut cartridge to cut the heart shape and placed the poem so that it fit inside.  I got the Spider-man bucket at Goodwill.  I found the poem on Pinterest
He was so surprised that I made it for him.  I love to see him smile and he had a very big smile.

Happy Scrappin',

Janice

Friday, February 22, 2013

Garbage Bread - What is that?

Well let me tell you a story.  I have been on Pinterest a lot lately and I have found a new favorite.  Garbage bread, the name is crazy, but the ingredients are awesome.  I believe it started in New York, where you just throw all your left overs from the fridge into a pizza crust and they just call it Garbage Bread.  You can find recipes all over the Internet.  I made mine up from just thinking about ingredients that I thought would be great together.  Most Garbage Breads start with Pizza dough, so when I was shopping the other day I picked up a Gluten Free Pizza dough mix from Bob's Red Mill.  I use Bob's a lot.  Bob's Red Mill is a local business in Milwaukie, OR not far from where I live.  So, as I sat yesterday thinking about how to put my Husbands Valentine Bouquet together, I wandered off in to the land of food, as I often do.  This is where I came up with the idea of our dinner the other night.  Gluten and Egg free Chicken, Broccoli, Bacon, Cheese and Ranch Garbage Bread.  With Gluten and Egg free Cinnamon rolls for dessert.  Everyone here (12 people) Loved it.  Some, my 2 grandsons, had seconds.   Ok, so here is my recipe.  I will be making my own Pizza dough soon also, so watch for it.

Gluten and Egg free Chicken, Broccoli, Bacon, Cheese and Ranch Garbage Bread.

Ingredients:
1 Pizza dough mix. (Bob's Red Mill)
1 lb chicken Cooked and chopped into bite size pieces when cool.
1/2 lb bacon Cooked and chopped into bite size pieces when cool.
2 cups Frozen chopped Broccoli.
1 cup Ranch dressing, (Gluten, Egg, Corn, Nut and Soy Free Recipe below)
2 Cups of shredded cheese.

Directions:
Pre-heat the Oven to 375 and follow the directions on the package to make the Pizza Dough.  While you are waiting for the dough to rise, you can make the ranch dressing.

Ranch Dressing:
1 cup Milk
2 Tbls Lemon juice
3 tsp Dried Parsley
3 tsp dried Chives
3 tsp dried Dill
2 tsp Garlic Powder
2 tsp Onion powder
1 tsp Sea Salt
1 tsp Black pepper

Directions:
In a 2 cup measuring cup put the 2 Tbls lemon juice and the cup of milk. This mixture makes buttermilk, the lemon juice causes the milk to curdle, causing buttermilk. Add all the other ingredients to the measuring cup and whisk together and set aside.

The dough should be ready to turn out onto a pastry sheet, I line mine with plastic wrap and put the dough on the middle then cover the dough with another piece of plastic wrap to keep it from sticking to my rolling pin.  Roll the dough into a rectangle approximately 11" x 17".  You could use parchment paper and then leave it on the paper when you bake it.  I think I will do that next time because it was hard to get it on to the cookie sheet, without it tearing up.  The gluten free pizza dough is sticky and hard to manage with your hands.

Once you have the dough rolled out, remove the top layer of plastic wrap and sprinkle on the Chicken, Bacon and Broccoli.  Whisk the Ranch dressing and pour it all over the top evenly.  Add the shredded cheese then roll it up making sure to tuck the ends in, so the filling doesn't ooze out.  The gluten free pizza dough is sticky and hard to manage without using the plastic wrap.  The plastic wrap helps you roll it up nicely.  I rolled mine from the long side because I had so many people to feed.  I rolled mine right onto an oiled cookie sheet, making sure I got the plastic wrap off.
This is what it looked like before I cooked it.  The gluten free pizza dough is more sticky that regular dough and it tends to separate easily.


Bake in the oven at 375 degrees for 35 - 40 minutes.  The crust will be golden brown and hard to the touch.  Let stand for 5 minutes or so.  Cut it into 2" wide slices and serve.

Next time I will try to take more pictures of the making and rolling of the final product.  This was an easy recipe and fun to see how it turned out.  The smell, while baking, was luring me into the kitchen to take a look to see if it was done.

It just happened that the Cinnamon rolls that I made for dessert was ready to put into the oven about the same time as the Garbage Bread.  The smells wandering through the house had everyone guessing what I was making for dinner.

I made a Mexican Garbage bread also.


 I made the dough then rolled it out onto plastic wrap and spread re-fried beans then added cooked ground turkey that had been seasoned with my own taco seasoning mix ( recipe below), then i sprinkled shredded cheese on top.  Rolled it up and when it was done, I added sour cream, salsa and olives to the top.  It too was yummy.

My Gluten Free Taco seasoning mix;
2 tsp onoin (powder or Minced)
2 tsp garlic  (powder or Minced)
1 tsp cumin
1 tsp oregano
1 tsp chilli powder
1/2 tsp crushed red pepper flakes
1/2 tsp paprika

Mix well and put into an air tight container.  You can adjust the season to your liking.  I make enough to fill an old seasoning container so that I don't have to make it up every time I want taco seasoning.

I think the next time I make this I will use Sun dried Tomatoes, Onions, Artichoke hearts, Spinach, Olives, and Feta.  I think that will be very yummy too.

If you try any of these recipes please let me know what you think and what you used to make your Garbage Bread.

Happy Scrappin',

Janice


I think it's time for a Blog Candy give away!!!

I noticed that my blog has almost 20,000 hits and I think that I should give away the new CTMH Surf's Up paper pack.  When it reaches 20,000 Hits
You will get:
6 - 12" X 12" B&T Duos (2 each of 3 double-sided designs)
6 - 12" X 12" Cardstock Sheets
2 - Sorbet
2- Surf's Up Teal
1 - Chocolate
1 Surf's Up Gold

So here are your options to enter the drawing for the Surf's Up paper pack.  

1. Follow my blog.
2. Follow me by E-mail.
3. Leave a comment for me on Facebook.
4. Re-pin on of my pins on Pinterest

And leave a comment on my blog to let me know what you did to enter the drawing.

Once my blog visitor counter hits 20,000 hits, I will draw the Winner's name and post it here and on Facebook.

Happy Scrappin',

Janice

Thursday, February 21, 2013

Scraptastic Treasures Online Gathering

You’re invited to enter my Mystery Hostess Giveaway!

Someone will walk away with $25.00 in FREE Close To My Heart Stamps/Inks/Paper of their choice!

One lucky winner will be announced February 28, 2013

1.  Go to my company sponsored website at http://janicewilson.myctmh.com/

2. In the bottom right hand corner of my website You will see the party that says-  Scraptastic Treasures Online Gathering. Click on Join, and  Simply shop my online catalog at http://janicewilson.ctmh.com/Retail/Category.aspx before Midnight Tuesday February 26, 2013 to be entered into the drawing. 

3.  Anyone that places an order by midnight on February 26, 2013 will get there name in the drawing where (1) lucky person is going to win $25.00 in free Stamps/Paper/Inks.

Don’t forget to check out the While Supplies Last link…LOTS of great products at incredible pricing.
Good Luck to you all.

Happy Scrapin',  

Janice

Wednesday, February 20, 2013

I actually finished the Boys layout.

Here is the finished Boys layout for Saturdays workshop.


I can't believe I actually finished my first layout for 2013.  Now I'll have to do one for the Girls.

Happy Scrappin',

Janice

Monday, February 18, 2013

Claire Scrapbook Layout

Here is the Claire Scrapbook Layout that we will be making on Saturday.  I am using the Claire papers but turned it into a Boys Layout.


Take a look and tell me what you think.
I also used Outdoor Denim, Sunset, Cashmere, Black and Creme Brulee cardstock.  I found the layout idea on Pinterest at this link http://pinterest.com/pin/44121271321433914/  I used the Art Philosophy Cricut Cartridge to cut out the Chevrons and the word Boys.

The class for this layout will be $10.00.  Please let me know by Thursday if you wish to take this class.

Happy Scrappin',

Janice

Cards for Class on Saturday, February 23rd.

Here are 3 cards that I made for class this coming Saturday, using the Claire papers.


The card class is $5.00.  Please let me know by Thursday if you will becoming to the class.  I will be posting the 2 page layout tomorrow.

Happy Scrappin',

Janice 

Sunday, February 10, 2013

My Gluten Free Egg Free Cinnamon Rolls

As you know I have been searching for recipes that I can eat and my family will love too.  I found one on the Baking Beauties Blog, here http://www.thebakingbeauties.com/2011/01/best-gluten-free-cinnamon-buns-or-rolls.html  Their Cinnamon Buns are delicious.  I changed the recipe a bit so that I can eat them too.  Here is my recipe.


My Gluten Free Egg Free Cinnamon Rolls
posted by Jeanine on Jan. 25, 2011 

Ingredients:
Topping:
·         4 Tbsp. butter (or margarine)
·         1/2 cup brown sugar
·         2 Tbsp. Cinnamon
·         1 tsp. vanilla extract

Over low heat, in a small saucepan, heat 4 Tbsp. butter (or margarine), 1/2 cup brown sugar, 2 Tbsp. Cinnamon, stirring until sugar dissolves. Add 1 tsp. vanilla extract. Remove from heat and pour into the bottom of a greased 9×13 pan with high sides

Filling:
Combine:
o    4 Tbsp. butter or margarine, very soft
o    3/4 cup firmly packed brown sugar
o    2 Tbsp. cinnamon

NOTE: Once thoroughly blended, you may add 1/2 cup re-hydrated raisins or pecans (optional). Set aside until the dough has been rolled into a rectangle.
Dough:
o    3  cups all-purpose gluten-free flour ( I use Bob’s Red Mill)
o    1 Tbsp GF rapid rise yeast ( I used regular GF yeast)
o    3 Tbsp granulated sugar
o    1/2 tsp salt
o    1 Tbsp xanthan gum
o    1 tsp baking powder
o    4 Tbsp butter
o    1 cup milk(you can use any kind of milk)
o    1 egg, room temperature( I mix 1/3 cup water and 1 Tbsp Ground Flax Seed for an egg substitute)
o    1 tsp cider vinegar
o    2 Tbsp oil (I used Olive Oil)
o    1 1/2 tsp vanilla

 Directions:
1.      In the bowl of your stand mixer, mix all dry ingredients until combined. Set aside.
2.      Put margarine in a glass measuring cup and microwave just until the margarine has melted. Remove from microwave and stir. Add milk, stir. Add other wet ingredients and whisk to combine.
3.      With the stand mixer running (using the paddle attachment), pour the wet ingredients into the dry ingredients. Scrap down the bowl if you have to.
4.      Allow to mix on medium speed for 3 minutes. Dough will be very thick and sticky.
5.      Take a piece of plastic wrap and lay it out on a slightly damp counter top, so it covers an area bigger than 8″ x 16″. Sprinkle 2 Tbsp of sugar on the wrap. Lay ball of dough on top of that. Gently lay another piece of plastic wrap over the top of the dough. Pat the dough down into a roughly rectangle shape. Lift and reposition the top plastic wrap whenever you need to. Roll the dough out (with the plastic wrap on top) to a rectangle approximately 8″ x 16″.
6.      Remove plastic wrap. Spread filling mixture evenly across dough’s surface. Leave 1 1/2″ along one short end without any filling, this is where your cinnamon rolls will be sealed.
7.      Starting along the short end, use the bottom sheet of plastic wrap to lift the edge of the dough and roll it up, forming a cylinder. Start with the edge that has filling on it, that will be the center of your finished rolls.
8.      Using a long piece of dark thread (light colors can be lost in the dough), cut the “cinnamon bun log” into 12 pieces, about 1" wide. You can do this by placing the thread underneath the roll, crossing it at the top, and pulling the threads so they cross each other, pulling it through the dough. This way, you won’t be squishing your dough down by cutting with a knife. Place rolls in prepared pan, with cut side up.  
9.      Allow the cinnamon rolls/buns to rise in a warm, draft free place for about 30 minutes, or until nearly double in size.
10.  Bake in preheated 350 degree F oven for 20-25 minutes, or until the tops are a nice golden brown.
11.  Allow to cool for about 5 minutes before inverting on a serving tray, and let the syrup run down over the rolls.
12.  These are best served warm, however, I had great success with reheating them in the microwave for a few seconds when they were a day old as well.

I added Cream Cheese Frosting to the tops of mine.  I made it using 4 oz Cream Cheese, 1 Tbsp Maple syrup and 1 Tbsp Milk.
Gluten-free AND Dairy-Free Cinnamon Rolls
o    REPLACE 1 cup milk with soy milk (or your favorite non-dairy milk)
o    REPLACE all of the butter/margarine with vegan butter (I used Earth Balance)

If you try this recipe, I hope you let me know how yours turns out.  

My husband asked me last night when I was going to make more.  He really liked them, so did the rest of my family who doesn't have to eat Gluten and egg free.  I am so glad, I really don't want to continue to make separate meals.  

Happy Baking'

Janice

Saturday, February 9, 2013

My Update on Living with Fibromyalgia

For Christmas my dear Hubby gave me a waffle maker,  I love waffles and so I have found a Gluten free waffle mix that is delicious.  In the past I loved to put peanut butter on my waffles and pancakes.  So I made waffles for dinner a week or so a go and put a little peanut butter on it, it was wonderful and I didn't seem to have an issue.  Last Saturday, I made waffles again for dinner and slathered the peanut butter on this time.  Within a few minutes after dinner, I felt my face become flushed.  I went to check and my face was bright red.  I went to my laptop and looked up Peanut allergies.  Sure enough I had some of the symptoms.  I woke up in the morning and was swollen from head to toe, it has taken 3 days for the swelling to go down.  I hope it goes away completely soon.  I guess I won't be eating Peanut Butter ever again.  So now I know that I have an intolerance or allergy to Gluten, Soy, Eggs and Peanut Butter.

Happy Scrappin',

Janice